
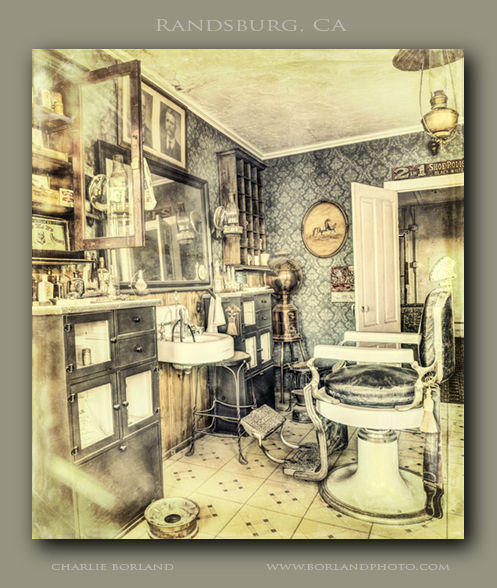
I have thing for photographing through windows of old west ghost towns and taking pictures through the old glass. I get my lens as close as I can to the glass without risking damage, then shade the lens as best I can to remove external reflections , and bracket exposures like crazy.
Here is the barbershop in Randsburg, CA shot a few weeks ago. You can see some of the outside reflections around the left side and that is due to my hands not blocking all the glare. I shot a two image pano: left and right side as vertical images, then let Photoshop stitch them. Next I went into Photomatix and gave it a medium HDR grunge look. Then opened in Topaz B&W Effects and used the filter: Flavescent which added the yellowed newspaper look I wanted. I finished with another layer using the Blueprint effect and set that to 30% opacity to add a dark edginess.
When I like what I created, I abandon it for the next image.
Join my mail list, get my ebook, or see my online photo courses, all here on this page.
As I pass through Las Vegas on my way to Arizona for the warm winter months, I cant help but stop in Vegas and do a little shooting. This image is from the Fremont Street area, which has been totally revitalized since my first visit to Las Vegas in 1985.
One of the cool things they have been doing here is preserving the old neon signs from hotels and motels that are no longer standing. So right outside the Fremont Experience areas are these awesome old signs and symbols.
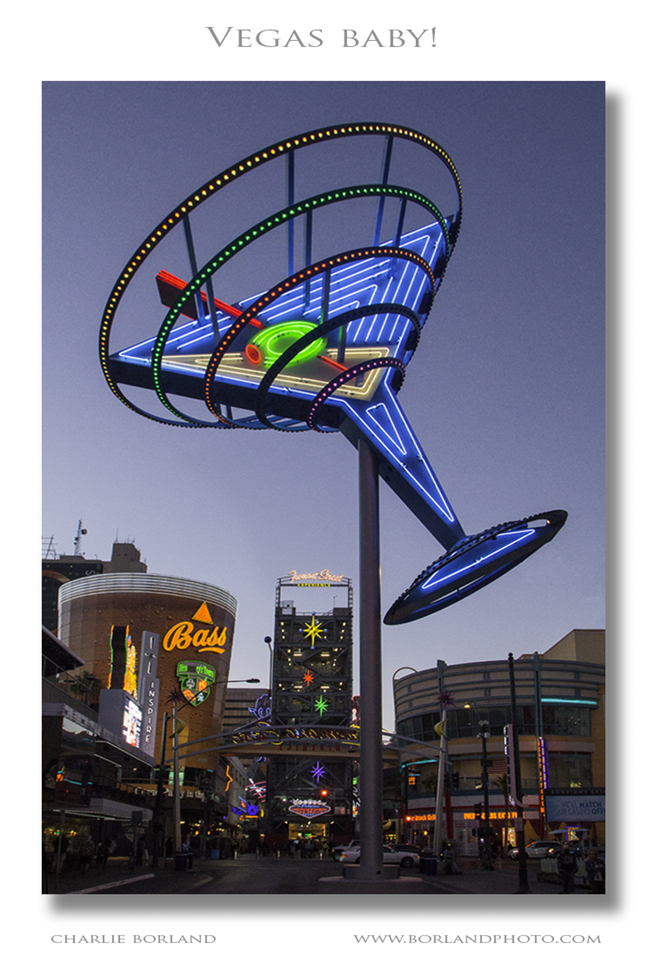
So I shot the old sign, hand held by the way, and opened in ACR where I added a little contrast, lightened shadows, tiny bit of Clarity, Vibrance, and Saturation. Then I opened in Photoshop and added several luminosity masks for shadows and highlights.
This allowed me to darken a few areas, lighten specific areas, and then selectively saturate more specifics. Then I straightened the angles and removed a light pole that was in the shots and Voila!
Hey, by the way, think about joining my mail list, getting my eBook, or signing up for an online course. All that info is on this page.
All the best!
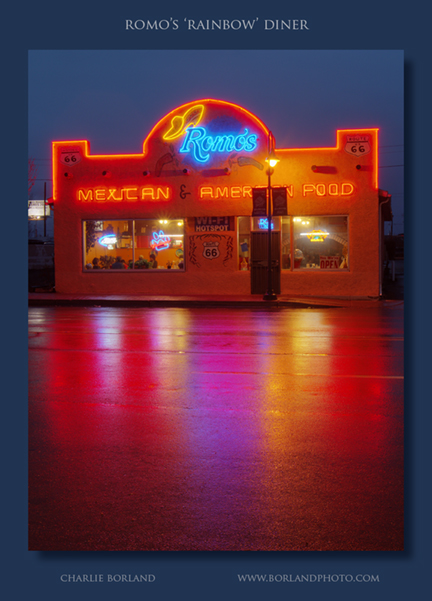
This is Romos Mexican Restaurant in Holbrook AZ on a chilly rainy night. I titled it Rainbow due to the obvious rainbow of color but that is not an official name. The rain ‘makes’ this image so colorful with the color reflections. I processed this with HDR software first and lightly to avoid the Grunge look and then blended back some parts with the original file. Shot with a 70D and 24-70 lens.
 Join my mail list on the right opt-in form.
I photographed this image at Red Rock Conservation Area, North of Las Vegas, about 6 weeks ago. I was zipping down the road from Mt. Charleston when I spotted the cactus starting to bloom. I guessed that I was about 1 week to early for full bloom, but I was not going to be here in a week, so I shot anyway.
I used a flash to fill in the shadows on the cactus and that worked great. But since it was 4 pm the light was not that great yet, so when I opened the image in Photoshop it looked like a basic snap. That’s where the fun begins. You get started and you never know where you are going in creating. Are these images ever DONE? No, they are abandoned when you are happy with the results.
 I always bracket exposures so the first thing I did was HDR process it with the only intention to add drama to the clouds. Then I opened Topaz B&W Effects and used the Cerulean set to colorize the image. Once I got here I decided I had what I wanted and subsequently ‘abandoned’ this image to go start the process all over another. If you want to know about Topaz, here’s the link: http://www.topazlabs.com/aff/idevaffiliate.php?id=196
Get my book on Outdoor Flash Photography below…..
Oh this was so fun! Drove through Holbrook AZ on our way to New Mexico. Stopped in Holbrook to shoot Petrified Forest and when driving through town we saw the Wigwam Motel. OMG–gotta shoot!
Came back at dusk and it started pouring down rain. Perfect! LOL. I did get pretty wet but who cares? I did a non-grungy HDR, then accentuated lighter areas by painting highlights in Photoshop, added a vignette, and a little more burning and dodging for effect. A teeny weeny bit sharpening. And I am done…for today that is.

A lot of time there is only so much you can do in camera and that is basically capturing the data as it is presented. It’s when you get into post processing where the magic is and this image is one example.
I photographed Kim and her family last week at their home. We shot in mid-afternoon and this made for lighting challenges. It was hot and humid and bright and sunny, so the light was far from perfect.
There are a million ways to make light work for you but it all depends on how much time you have. You can erect panels that block light from hitting your subject, or in the case of this shoot, work in the shade. Unfortunately there was only a little shade that time of day, so I made it work.

What I like about post processing is that you can go anywhere and everywhere. Here I am experimenting with blended color overlays which sneaks in small amounts of yellow and green in specific spots. It looks sorta like cross processing of days past. More to come once these guys make their selection of images and I process them.
Learn portrait photography here.
I have been experimenting when time allows with variations of B&W images. I like HDR although admit that the days of super grunge are over for me. All the color globs and noise….been there, processed that!
HDR has come a long way and now I use it more for creating natural looking images with lower contrast like some architectural assignments I get for time to time.
I have photographed some objects over time where i went crazy with grungy HDR but now I prefer to process more normal and then maybe with a hint of grunge…then converting to B&W.
 Here is a piece of equipment at an old mine in Arizona that I processed in HDR and as color then converted to B&W and pushed around a few of the tones with a B&W Adjustment Layer. The HDR does a good job of adding edge to textures and then those are converted to tones in B&W. This next image
Recently, I wrote about stumbling upon the Lost Dutchman miner, of the legendary Lost Dutchman mine, while wandering the Arizona desert photographing and described how he posed for me in a photograph.
After that, I continued across Arizona and New Mexico searching for more great landscapes and flower displays when as luck would have it, I again stumbled on another well know western figure: U.S. Marshal Rooster Cogburn.
In case you don’t know who that is; he is the infamous Marshall who reportedly shot 64 bad guys. He is from Arkansas but his Marshall duties have taken him around the west hunting for the usual desperado’s.
His most well-known manhunt; was that of murderer Tom Chaney who had killed the father of Mattie Ross and was on the run. So Cogburn went after him hoping to capture and bring him back to Texas for trial.
As we drove from New Mexico into West Texas, we stopped in Sierra Blanca to gas-up and decided to get a drink. Having never been there, we found a small cantina and went on in. After 5 minutes I heard a loud ruckus and there was some fat old guy drunk at the bar.
After watching for a minute I realized who it was: Rooster Cogburn. I could not believe it but told my wife let’s just watch. For an hour he was there bellowing and boasting before sitting at the table next to us.
To make a long story short, we struck up a conversation and I eventually asked him if I could photograph him on the side of the cantina building. He grinned and agreed, but pulled out his 6-gun and said if the pictures were bad he’d shoot me.
I promised they would be very flattering.
So we went out back and I set up two flash units with wireless triggers to add some light on him. I purposely chose the shaded side of the building and then the flash units to add light rather than fight the sun with fill flash.
He was swaying a bit so I used a shutter speed of 1/125th at f/5.6 and hoped there would be no blur. I thought the picture looked pretty good and mailed him one to some address in Mexico. Not sure if he got it.

I am still wandering around Arizona and photographing flowers as I find time. I stumbled on these beautiful purple flowers and am beginning to see these everywhere. I guess they are called Blue Bells and in some locations they carpet the ground.

I was out a few nights ago when I found this rocky area and the flowers were protruding form the rocks and I thought ‘how cool.’ Rough rocks that would shred your skin if you fell, covered with dainty and delicate flowers.